Garlic (Allium sativum) is one of the most useful and healthy crops you can grow at home. It adds flavor to almost any meal and supports your health by boosting immunity, reducing inflammation, and lowering blood pressure. Best of all, it’s easy to grow—even if you don’t have a garden. With one simple trick, you can root garlic faster and grow it continuously at home.
Why grow garlic yourself?
Here’s why growing garlic at home is a smart move:
- It saves money.
- You avoid chemicals often found on store-bought garlic.
- You can have an ongoing supply by replanting.
- Garlic grows well in pots, small spaces, or even indoors.
Step 1: Pick the right garlic
Choose the right type of garlic for fast rooting and better growth.
- Hardneck garlic – Strong flavor and large cloves.
- Softneck garlic – Stores longer and handles different climates.
- Organic garlic – Ideal for growing because it hasn’t been treated with chemicals.
Where to get it: Try organic markets, farmers’ markets, garden centers, or online seed sellers. Avoid supermarket garlic that’s been treated to stop sprouting.
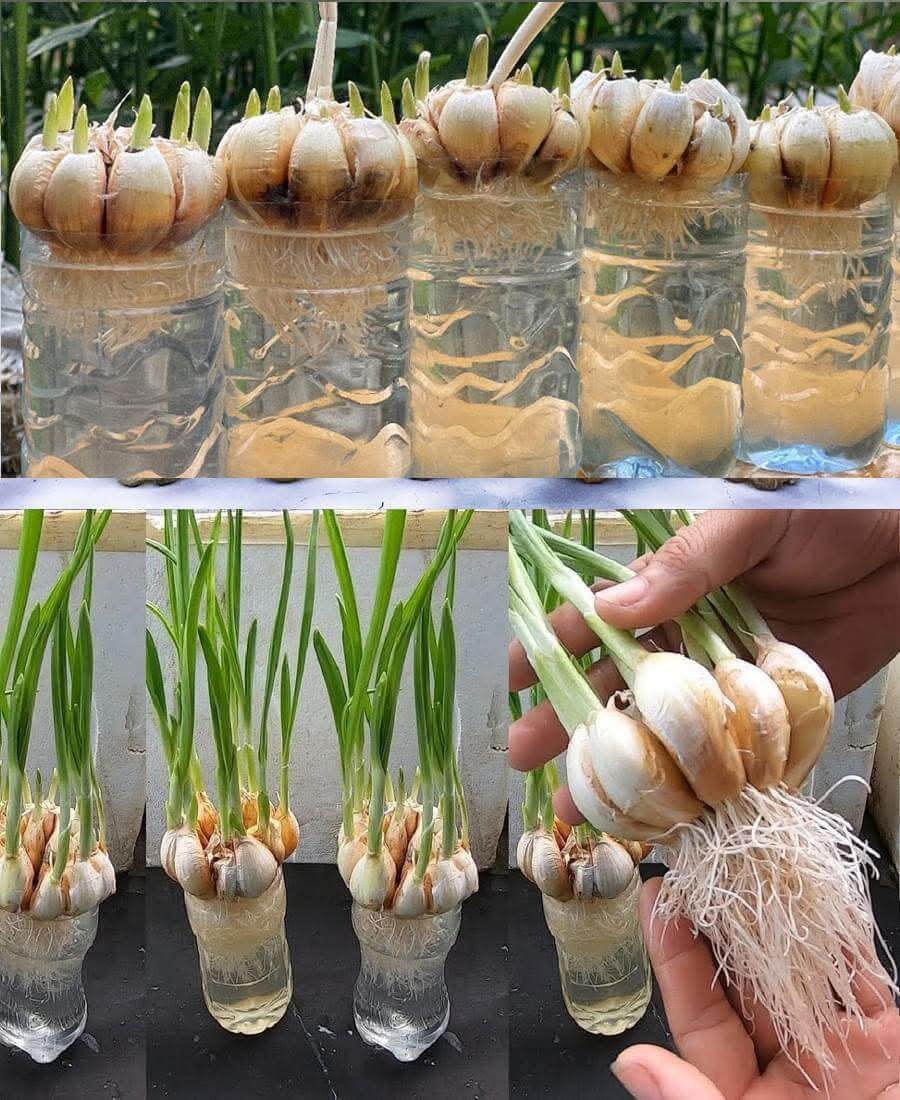
Step 2: Use this water rooting trick
This trick helps your garlic sprout roots faster before planting.
How to do it:
- Break the bulb into cloves, but keep the papery skin on.
- Put a little water in a shallow dish or jar—just enough to touch the clove base.
- Set the cloves upright with the pointed end up and root end in the water.
- Change the water every 1–2 days to keep it fresh.
- In about 5–7 days, white roots will appear.
Once the roots are ½ to 1 inch long, they’re ready to plant.
Step 3: Plant garlic in soil
Time to move the rooted cloves into soil.
- Use well-draining, loamy soil with added compost.
- pH should be between 6.0 and 7.0.
- Loosen the soil 6–8 inches deep.
- Plant cloves 2 inches deep and 4–6 inches apart, root side down.
- Water gently and cover with mulch like straw to hold moisture.
Best planting time:
- Fall is ideal for big bulbs.
- Spring planting works but usually gives smaller bulbs.
Step 4: Take care of your garlic
- Water enough to keep soil moist, but don’t overwater.
- When bulbs begin forming, reduce watering.
- Fertilize early with nitrogen, then switch to phosphorus during bulb growth.
- Garlic needs 6–8 hours of direct sunlight daily.
Step 5: When and how to harvest
Garlic is ready after a few months.
- Softneck garlic: 90–120 days.
- Hardneck garlic: 100–150 days.
- Watch for yellowing leaves that start to dry out.
To harvest:
Loosen the soil with a fork and gently pull out the garlic. Let it dry (or “cure”) in a shaded spot for 2–3 weeks.
Step 6: Keep growing garlic again and again
Want a never-ending garlic supply? Just replant.
- Save the biggest, best bulbs.
- Use the water trick again for quick sprouting.
- Rotate planting spots to keep soil healthy.
Step 7: Store garlic the right way
If you grow more garlic than you can use right away, store it properly:
- At room temperature: In a dry, cool place, it can last up to 6 months.
- In the freezer: Peel and freeze cloves for later use.
- As garlic powder: Dry and grind garlic into seasoning.
Mistakes to avoid
- Don’t use chemically treated garlic from stores.
- Don’t overwater—garlic doesn’t like soggy soil.
- Don’t plant too deep or too shallow.
- Don’t harvest too early—wait for the leaves to dry out first.
Growing garlic at home is easy and rewarding. With this simple water rooting trick, you can speed up the process and enjoy fresh garlic all year long.